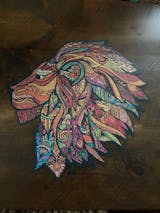
Turn your puzzle into stunning wall art:
✨ Congrats on finishing your WAWW masterpiece! Whether you took your time or powered through in a weekend, you now hold a unique piece of art — and it deserves to shine beyond the table. Framing your wooden jigsaw puzzle is easy and rewarding. Here’s your no-fuss, glue-on-the-back-only guide tailored for WAWW’s laser-cut wood puzzles (no messy glue on the front, ever! 🙅♀️).
🔧 Step 1: Gather Your Supplies.
✔️ Your completed WAWW puzzle
✔️ Glue (Pick one — they all work great):
• Elmer’s Glue-All – Classic, affordable, dries clear
• Mod Podge – Matte or glossy finish, your call
• PVA (white glue) – Budget-friendly and super strong
✔️ A wide brush or plastic spreader
✔️ Wax paper or parchment paper
✔️ Clean, flat surface
🖌 Step 2: Glue the Back (Only the Back!).
- Protect your surface: Lay down wax/parchment paper to catch any glue drips.
- Flip your puzzle over: Keep it intact (a baking sheet helps for the flip!). Place it face-down on your surface.
- Apply a thin, even layer of glue: Brush it over the entire back – edges, corners, and crevices. Don't soak it — just enough to hold everything in place.
- Let it dry completely: Follow your glue's dry time (a few hours minimum), but overnight is best for a super sturdy bond. 💤
🖼 Step 3: Choose Your Framing Style.
Now the fun part: framing your puzzle! Here are 4 easy options:
- 💸 Budget-Friendly – Poster Frame Magic
Buy a poster frame that fits your puzzle size (WAWW standard: 23x15" or 31x23"). Pop your puzzle in and boom — instant display piece.
- ✂️ DIY Chic – Tape + Board Combo
Stick your puzzle to a foam board or sturdy cardboard using double-sided tape. Clean, modern, and easy to hang — with or without a frame.
- 🌟 Gallery-Worthy – Floating Frame
Create that “art gallery” feel. Floating frames give your puzzle breathing room and style — they’re sleek, minimal, and elegant.
- 🎨 The Collector’s Choice – Custom Framing
Want museum-quality? A local framer can help you pick archival matting and frames that elevate your puzzle into true wall art. Worth it for your favorite builds!
🏡 Step 4: Display & Enjoy!.
Once framed, your puzzle is ready to make a statement. Hang it with picture hooks, command strips, or lean it on a shelf for a relaxed vibe.
✨ It's more than just a puzzle — it's a story, a memory, and a slice of creativity you brought to life.
Bonus Tips
• Keep puzzles away from direct sunlight to prevent fading ☀️
• Prefer a matte finish if you’re avoiding reflections
• Want to switch puzzles seasonally? Use a magnetic frame or Velcro strips on the back of your board for easy swaps 🔄
Want to show off your framed puzzle? Tag us on Instagram @wawwpuzzles
— we love seeing where our puzzles end up! 💛


